How to Restore Files from File History in Windows 10
In this article we will help you with the trick to Restore Files from File History. The Windows 10 backup program, File History, saves the files that you‘ve created. It doesn’t back up your apps and programs. After all, apps and programs can always be reinstalled. But many of the moments that inspired so many of your photos, videos, and documents can never be re-created. (Restore Files from File History)
File History makes your backups easy to see and restore, letting you flip through different versions of your files and folders, comparing them with your current versions. Should you find a better version, a press of a button brings that older version back to life.
Step by Step Guide to Restore Files from File History in Windows 10
Step 1:
Click the taskbar’s File Explorer icon (shown here) and then open the folder containing the items you’d like to retrieve.
Step 2:
Click the Home tab on the Ribbon atop your folder; then click the History button.
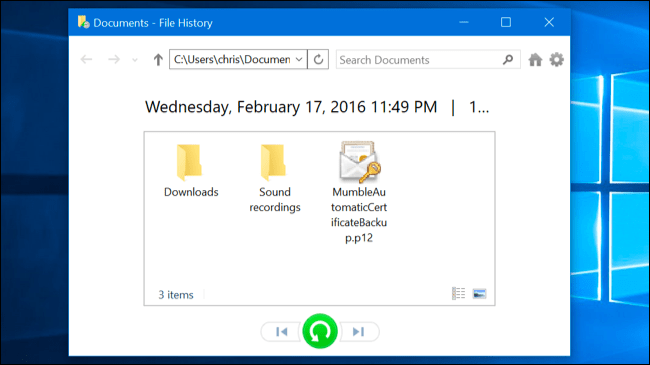
Clicking the History button, shown here, fetches the File History program, shown in the following figure. The program looks much like a plain old folder. For example, the figure shows what happens if you click the History button in any folder and then click File History’s Home button: That button lets you see all of your backed up folders.
Step 3:
Choose what you’d like to restore. (Restore Files from File History)
Point and click your way through the libraries, folders, and files until you spot the item or items you’d like to restore:
* Folder: To restore an entire folder, open it so you’re viewing its contents.
* Files: To restore a group of files, open the folder containing them, so the files’ icons are onscreen.
* One file: To restore an earlier version of a file, open that file from inside the File History window. File History displays that file’s contents.
Step 4:
Move forward or backward in time to find the version you’d like to restore.
To browse through different versions of what you’re currently viewing, choose the left-pointing arrow along the bottom, as shown here. To see a newer version, choose the right-pointing arrow.
Step 5:
Click the Restore button to restore your desired version.
Step 6:
Choose how to handle the conflict. (Restore Files from File History)
If Windows notices a naming conflict with the item you’re trying to restore, File History offers you three ways to handle the situation.
* Replace the File in the Destination Folder.
Click this option only when you’re sure that the older file is better than your current file.
* Skip This File.
Click this if you don’t want to restore the file or folder. This option returns you to File History, where you can browse other files.
* Compare Info for Both Files.
Often the best choice, this option lets you compare the files’ sizes and dates before choosing which one to keep, the incoming file or the currently existing file. Or, if you want, this choice also lets you keep both files: Windows simply adds a number after the name of the incoming file, naming it Notes (1), for example.
Step 7:
Exit File History by closing the window.
You close the File History window just as you close any other window: Click the X in its top-right corner. (Restore Files from File History)
Note: To keep your files safe, File History automatically makes a copy of every file in your Documents, Music, Photos, and Videos folders. It copies all the files on your desktop, as well. And File History automatically makes those copies every hour.
| Also Read | Tech Guide! Here is Step by Step Guide of How to Activate Windows 10 |