How to Change the Canvas Size in Photoshop CS6
In this trick we will teach you with tips to Change the Canvas Size in Photoshop CS6. There are multiple options for changing the size of your image in Adobe Photoshop Creative Suite 6. The Canvas Size command is as safe as can be. Unlike the Image Size command, which enlarges or reduces the dimensions or resolution of your image, the Canvas Size command merely changes the size of the canvas, or page, on which the image sits. (Change the Canvas Size in Photoshop CS6)

About Adobe Photoshop: (Change the Canvas Size in Photoshop CS6)
Adobe Photoshop is a raster graphics editor developed and published by Adobe Inc. for Windows and macOS. It was originally created in 1988 by Thomas and John Knoll. Since then, the software has become the industry standard not only in raster graphics editing, but in digital art as a whole.
The software’s name has thus become a generic trademark, leading to its usage as a verb (e.g. “to photoshop an image”, “photoshopping”, and “photoshop contest”) although Adobe discourages such use. Photoshop can edit and compose raster images in multiple layers and supports masks, alpha compositing and several color models including RGB, CMYK, CIELAB, spot color, and duotone.
Step by Step guide to Change the Canvas Size in Photoshop CS6
Step 1:
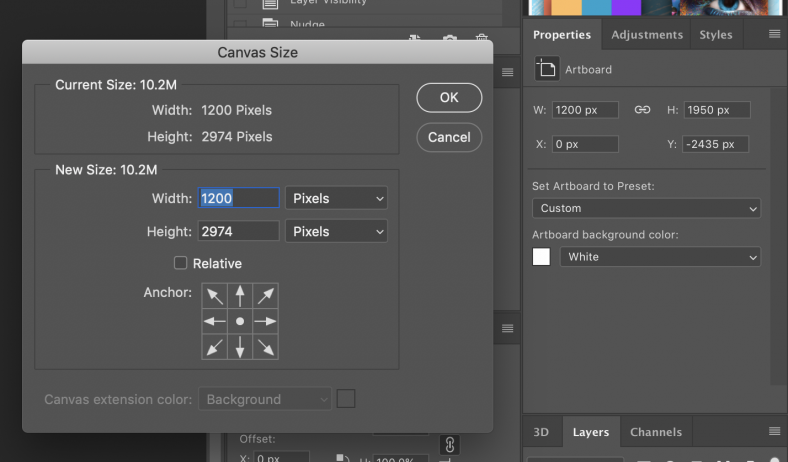
Choose Image → Canvas Size.
The Canvas Size dialog box appears. The current size of your canvas appears at the top of the dialog box.
Step 2:
Enter new values in the Width and Height text boxes.
You can also change the unit of measurement by using the pop-up menus.
Select the Relative check box to be able to specify an amount of space for Photoshop to add or remove around your image. This feature is handy when you’re adding or removing equal amounts of canvas around images with fractional measurements.
Step 3: (Change the Canvas Size in Photoshop CS6)
Specify your desired anchor placement.
The anchor shows how the image sits inside the canvas. By default, Photoshop centers the image and adds or removes the canvas around it. Click any of the other eight squares to have Photoshop add or remove the canvas asymmetrically around the image.
If you reduce either the Width or Height value and then click OK, an alert box appears asking if you really want to proceed because you’ll be clipping the image. This is actually another way of cropping an image, albeit not one you’ll use every day.
Step 4:
Select your canvas color from the Canvas extension color pop-up menu and click OK.
Choose from Foreground, Background, White, Black, Gray, or Other. If you select Other, Photoshop transports you to the Color Picker, where you can select any color you desire. The small swatch to the right of the pop-up menu displays the current background color. You can also click this swatch to access the Color Picker.
| Also Read | How to resize an image in Adobe Photoshop |