Screenshots are an integral part of the smartphone experience. Whether you want to capture a memorable moment in a game or share something interesting with a friend, knowing how to take screenshots on your Android device is essential.
All the Ways to Take Screenshots on Android
However, if you’ve recently switched to Android from an iPhone or are using a new Android phone, you might be wondering about the various methods available for taking screenshots.
The world of Android is diverse, with numerous manufacturers putting their unique spin on the operating system. This means that while there are general methods for taking screenshots on Android, your specific device might offer additional or different options. In this comprehensive guide, we will explore various ways to take screenshots on Android, ensuring you’re well-equipped no matter what Android phone you have.
Method 1: Basic Screenshot
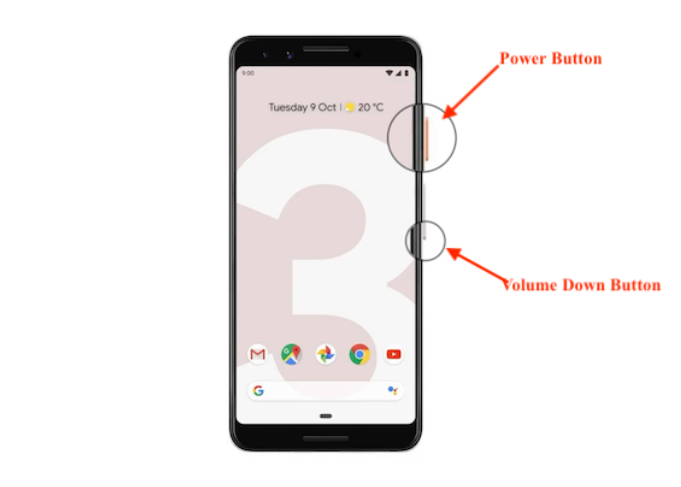
Step 1: To take a basic screenshot, press and release the Power and Volume Down buttons simultaneously. If successful, your screen will briefly flash, and the screenshot will appear as a thumbnail.
Note: The exact button timing may vary between devices. On some phones, like the Pixel, a quick press and release of the buttons are sufficient, while on others, you may need to hold them together for a second or more.
This method should work on most modern Android devices, including those from Google, Samsung, OnePlus, and others. It has become the standard method, replacing the older shortcut that involved pressing the Home button.
Method 2: Using the Power Button Menu
Step 1: Another method available on newer Android versions is to hold down the Power button until you see an expanded menu appear.
Step 2: Look for the “Screenshot” option in the menu. If your phone and Android version support it, this option should be available.
Method 3: Voice Control
Step 1: If you prefer voice commands, you can use your phone’s digital assistant to take a screenshot. For instance, you can say, “Hey Google, take a screenshot,” and the assistant will execute the command.
Method 4: Gesture Screenshot
Step 1: Depending on your phone model, you may have the option to take a screenshot using a gesture. On Google Pixel devices, swipe up from the bottom of the screen as if you were switching apps.
Step 2: You’ll see a “Screenshot” option at the bottom of the screen for the app you’re hovering over. Alternatively, if your phone uses three-button navigation, you can press the Overview (square) button to access this feature.
On Samsung Galaxy phones, you can enable “Palm swipe to capture” in Settings > Advanced features > Motions and gestures. Once enabled, swipe your palm across the screen to capture a screenshot.
Method 5: Scrolling Screenshot
Step 1: A scrolling screenshot allows you to capture an entire webpage or a lengthy document, rather than just what’s visible on your screen.
Step 2: Start by taking a regular screenshot on a long page.
Step 3: Once the screenshot is taken, you’ll see a “Capture more” button next to the thumbnail. Tap it.
Step 4: Android will open a new window displaying the entire page as one long image. The original screenshot appears in a crop window, and you can resize it to capture a specific section or drag the bottom of the crop window down to capture the entire page.
Now that you know all the ways to take screenshots on your Android device, you can choose the method that works best for you and make the most of this essential feature. Whether it’s a quick basic screenshot or a scrolling capture of an entire webpage, Android provides various options to suit your needs.